TheDeveloperBlog.com
C-Sharp | Java | Python | Swift | GO | WPF | Ruby | Scala | F# | JavaScript | SQL | PHP | Angular | HTML
Android Linkify Example
Android Linkify Example with examples of Activity and Intent, Fragments, Menu, Service, alarm manager, storage, sqlite, xml, json, multimedia, speech, web service, telephony, animation and graphics
Android Linkify ExampleThe Linkify class is used to create the links from the TextView or the Spannable. It converts the text and regular expression to the clickable links on the basis of the pattern match of text value and the regex. The Linkify class creates the links for web URL, email address, phone number, and map address by using pattern. Android clickable links can be created by two different ways: 1. Using layout (.xml) file: it uses autoLink attribute with the specified type.
<TextView
     android:id="@+id/url"
            android:autoLink="web"/>
2. Using Java class: it uses the addlLinks() method with specified types of Linkify class.
TextView webURL = new TextView(this);
webURL.setText("https://www.yoururl1.com/");
Linkify.addLinks(webURL , Linkify.WEB_URLS);
Android Linkify Example
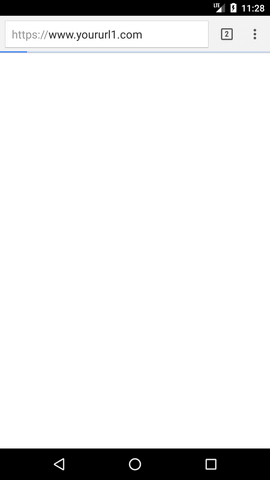
In this example, we will create links for the web URL, email address and phone number. Create an activity_main.xml file in layout directory and add the following code. activity_main.xml
<?xml version="1.0" encoding="utf-8"?>
<RelativeLayout xmlns:android="http://schemas.android.com/apk/res/android"
    xmlns:app="http://schemas.android.com/apk/res-auto"
    xmlns:tools="http://schemas.android.com/tools"
    android:layout_width="match_parent"
    android:layout_height="match_parent"
    tools:context="example.TheDeveloperBlog.com.androidlinkify.MainActivity">

    <ListView
        android:id="@+id/list"
        android:layout_width="match_parent"
        android:layout_height="wrap_content"
        android:layout_marginBottom="50dp">
    </ListView>
</RelativeLayout>
Create a custom layout myList.xml file and add the following code. In this layout, we use autoLink attribute with the web, email, and phone property. myList.xml
<?xml version="1.0" encoding="utf-8"?>
<LinearLayout xmlns:android="http://schemas.android.com/apk/res/android"
    android:layout_width="match_parent"
    android:layout_height="match_parent"
    android:orientation="horizontal" >

    <ImageView
        android:id="@+id/icon"
        android:layout_width="60dp"
        android:layout_height="60dp"
        android:padding="5dp" />

    <LinearLayout android:layout_width="wrap_content"
        android:layout_height="wrap_content"
        android:orientation="vertical">

        <TextView
            android:id="@+id/url"
            android:layout_width="wrap_content"
            android:layout_height="wrap_content"
            android:text="Medium Text"
            android:autoLink="web"
            android:textStyle="bold"
            android:textAppearance="?android:attr/textAppearanceMedium"
            android:layout_marginLeft="10dp"
            android:layout_marginTop="5dp"
            android:padding="2dp"
            android:textColor="#4d4d4d" />
        <TextView
            android:id="@+id/email"
            android:layout_width="wrap_content"
            android:layout_height="wrap_content"
            android:text="TextView"
            android:autoLink="email"
            android:layout_marginLeft="10dp"/>
        <TextView
            android:id="@+id/phonenumber"
            android:layout_width="wrap_content"
            android:layout_height="wrap_content"
            android:text="TextView"
            android:autoLink="phone"
            android:layout_marginLeft="10dp"/>
    </LinearLayout>
</LinearLayout>
Create an adapter class MyListActivity.java and extends ArrayAdapter<> with the following code. MyListActivity.java
package example.TheDeveloperBlog.com.androidlinkify;

import android.app.Activity;
import android.text.util.Linkify;
import android.view.LayoutInflater;
import android.view.View;
import android.view.ViewGroup;
import android.widget.ArrayAdapter;
import android.widget.ImageView;
import android.widget.TextView;

public class MyListAdapter extends ArrayAdapter<String> {

    private final Activity context;
    private final String[] url;
    private final String[] email;
    private final String[] phonenumber;
    private final Integer[] imgid;

    public MyListAdapter(Activity context, String[] url,String[] email,String[] phonenumber, Integer[] imgid) {
        super(context, R.layout.mylist, url);
        // TODO Auto-generated constructor stub
        this.context=context;
        this.url=url;
        this.email=email;
        this.phonenumber=phonenumber;
        this.imgid=imgid;

    }

    public View getView(int position, View view, ViewGroup parent) {
        LayoutInflater inflater=context.getLayoutInflater();
        View rowView=inflater.inflate(R.layout.mylist, null,true);

        TextView titleText = (TextView) rowView.findViewById(R.id.url);
        TextView subtitleText = (TextView) rowView.findViewById(R.id.email);
        TextView phonenumberText = (TextView) rowView.findViewById(R.id.phonenumber);
        ImageView imageView = (ImageView) rowView.findViewById(R.id.icon);
        imageView.setImageResource(imgid[position]);

        titleText.setText(url[position]);
        subtitleText.setText(email[position]);
        phonenumberText.setText(phonenumber[position]);
        Linkify.addLinks(phonenumberText,Linkify.PHONE_NUMBERS);

        return rowView;
    };

}
Finally, in the MainActivity.java class, set the adapter instance to ListView. MianActivity.java
package example.TheDeveloperBlog.com.androidlinkify;

import android.support.v7.app.AppCompatActivity;
import android.os.Bundle;
import android.widget.ListView;

public class MainActivity extends AppCompatActivity {
    ListView list;

    String[] urls ={
            "https://www.yoururl1.com/","https://www.yoururl2.com/",
            "https://www.yoururl3.com/","https://www.yoururl4.com/",
            "https://www.yoururl5.com/","https://www.yoururl6.com/",
            "https://www.yoururl7.com/","https://www.yoururl8.com/",
            "https://www.yoururl9.com/","https://www.yoururl19.com/",
    };

    String[] emails ={
            "email_1@mail.com","email_2@mail.com",
            "email_3@mail.com","email_4@gmail.com",
            "email_5@mail.com","email_6@mail.com",
            "email_7@mail.com","email_8@mail.com",
            "email_9@gmail.com","email_10@mail.com"
    };

    String[] phoneNumber ={
            "+(1234)-567","+(1234)-567",
            "7563654321","9475000000","8575000000",
            "+1 (919) 555-1212","+91 (919) 555-1212",
            "6463654321","5475000000","8575000000",
    };

    Integer[] imgid={
            R.drawable.image_1,R.drawable.image_2,
            R.drawable.image_3,R.drawable.image_4,
            R.drawable.image_5, R.drawable.image_6,
            R.drawable.image_7,R.drawable.image_8,
            R.drawable.image_9,R.drawable.image_10,
    };
    @Override
    protected void onCreate(Bundle savedInstanceState) {
        super.onCreate(savedInstanceState);
        setContentView(R.layout.activity_main);

        MyListAdapter adapter=new MyListAdapter(this, urls, emails,phoneNumber,imgid);
        list= findViewById(R.id.list);
        list.setAdapter(adapter);
    }
}
Output: 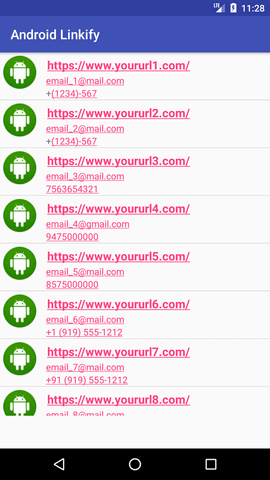 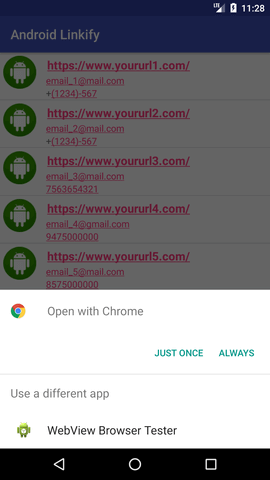
Next TopicIntro Slider
|


Related Links:
- Android Emulator
- Android Auto
- Learn Android Tutorial | Android Studio Tutorial
- Android Hide Title Bar Example
- Android Versions
- Android Watch
- Android Custom ListView
- Android RatingBar Example
- Android WebView Example
- Android Preferences Example
- Android Internal Storage Example - TheDeveloperBlog.com
- Android Custom RadioButton
- Android AlertDialog Example
- Android TabLayout
- Android TabLayout with FrameLayout
- Android Volley Library - Registration, Log-in, and Log-out
- Android Spinner Example
- Android Device Manager
- Android Studio
- Android Interview Questions (2021)
- Android EditText with TextWatcher
- Android Activity Lifecycle
- Android File Transfer
- Android Linkify Example
- Android Custom CheckBox
- Android RadioButton
- Android Dynamic RadioButton
- Android External Storage Example - TheDeveloperBlog.com
- Android Screen Orientation Example
- Android SearchView
- Android SearchView on Toolbar
- Android Caller talker example
- Android StartActivityForResult Example
- Android Share App Data
- Android Fragments
- Android Option Menu Example
- Android Context Menu Example
- Android Popup Menu Example
- Android Intent Example
- Android Explicit Intent Example
- Android Bluetooth Tutorial
- Android bluetooth list paired devices example
- Android AutoCompleteTextView Example
- Android ListView Example
- Android AlarmManager
- Android Google Map Search Location using Geocodr
- Android Simple Graphics Example
- Android Animation Example
- Android Wifi Example
- Android Camera Tutorial
- Android Sensor Tutorial
- Android Image Switcher
- Android Image Slider
- Android Custom Toast Example
- Android ToggleButton Example
- Android Checkbox Example | Food Ordering Example
- Android Quiz | Android Online Test
- Android ScrollView Horizontal
- What is android
- Android TextToSpeech Tutorial
- Android TextToSpeech Example
- Android MediaRecorder example
- History of Android
- Android Architecture | Android Software Stack
- Android Core Building Blocks | Fundamental Components
- Android Widgets Tutorial
- Android Button Example
- Android Toast Example
- Adding Android Google Admob
- Adding Android Banner Ads
- Android Service Tutorial
- Android Telephony Manager Tutorial
- Android Call State Example
- Android Call State BroadCastReceiver Example
- Android Seekbar example
- Android DatePicker Example
- Android TimePicker Example
- Android Sqlite Tutorial
- Android SQLite Example with Spinner
- Android XML Parsing using SAX Parser
- Android RSS Feed Reader
- Android Analog Clock and Android Digital Clock Example
- Android ProgressBar Example
- Android ScrollView Vertical
- Android Firebase Authentication - Google Login
- Android Notification
- Android XML Parsing using DOM Parser
- Android XMLPullParser Tutorial
- Android JSON Parsing Tutorial
- Android ViewStub
- Android Network Connectivity Services
- Android Web Service | Android Restful Web Service
- Android Google Map
- Android Google Map displaying Current Location
- Android Messages
- Android Oreo
- Android TV
- Android Screenshot
- Adding Android Interstitial Ads
- Android QR Code / Bar Code Scanner
- Android Intro Slider Example
- Android RecyclerView List Example
- Android Swipe to Delete RecyclerView items with UNDU
- Integrating Google Sign-In in Android App
- Integrating LinkedIn API in Android App
- Integrating Twitter API in Android App