TheDeveloperBlog.com
C-Sharp | Java | Python | Swift | GO | WPF | Ruby | Scala | F# | JavaScript | SQL | PHP | Angular | HTML
Integrating Twitter API in Android App
Integrating Twitter API in Android App with examples of Activity and Intent, Fragments, Menu, Service, alarm manager, storage, sqlite, xml, json, multimedia, speech, web service, telephony, animation and graphics
Integrating Twitter API in Android AppIn this tutorial, we will integrate the Twitter Log-in API into an Android app. For integrating Twitter API in the Android app, it requires the app Consumer Key (API Key) and Consumer Secret (API Secret). It can be generated from https://apps.twitter.com/. Combining the Twitter API in Android app helps users for log-in using the Twitter account, share tweets, etc. Steps to generate Twitter API Key and API Secret
1. Log-in at https://apps.twitter.com/ with your Twitter account and click on 'Create New App'. 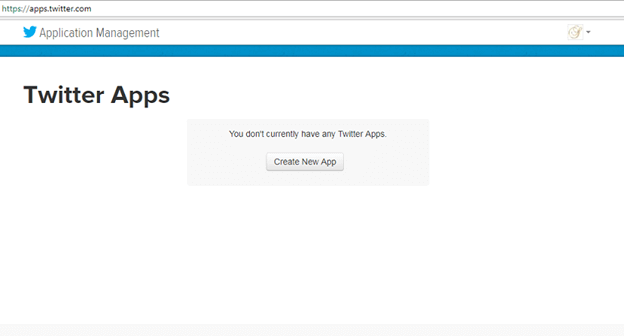
2. Fill all the required detail in new open form and click on 'Create your Twitter Application'. 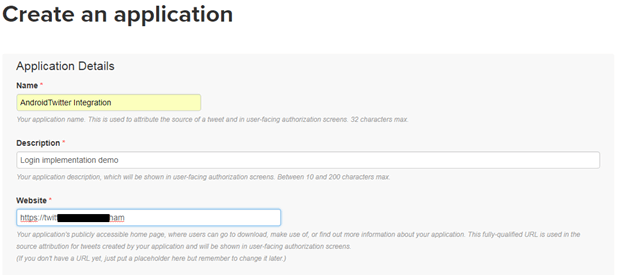
3. Select the application permission mode for our app. Here we select Read, Write and Access direct messages and click 'Update Settings'. 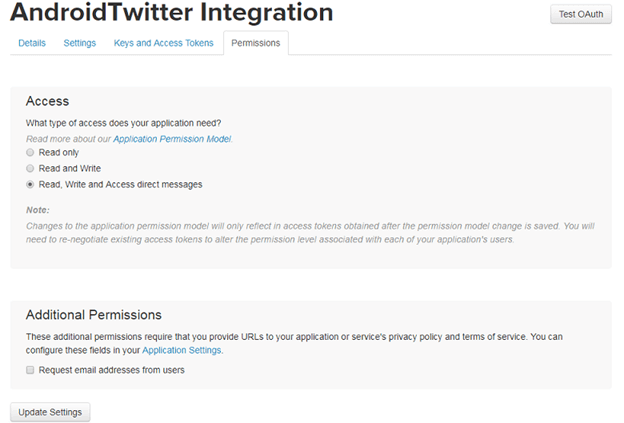
4. Now, open the 'Settings' tab and fill all the required details and click 'Update Settings'. 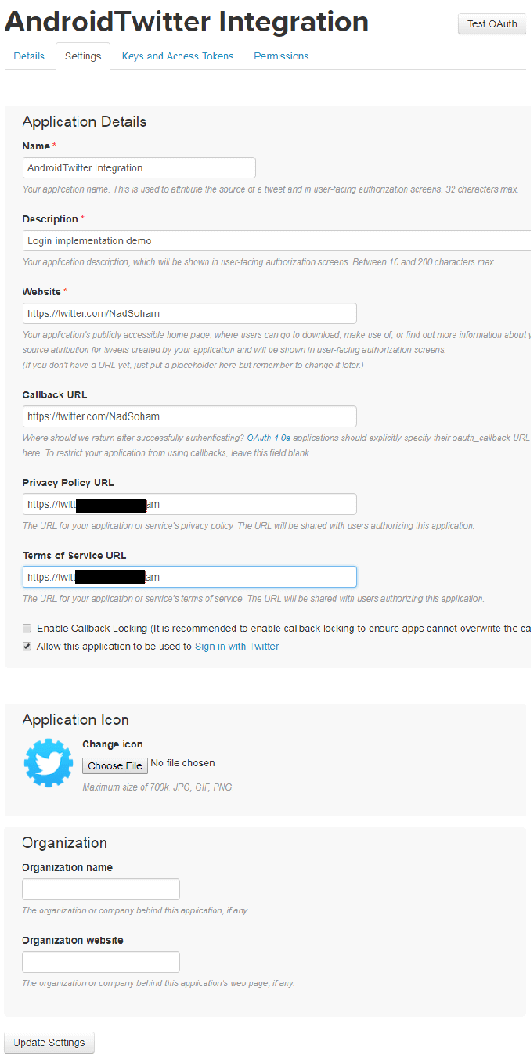
5. Now again, open Permissions tab and enable 'Request email from users' and click again 'Update settings'. 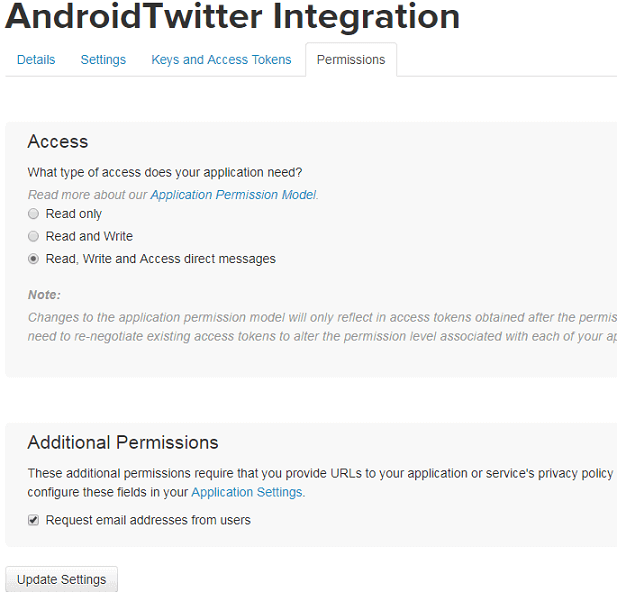
6. Now, open 'Key and Access Tokens' tab, we will find our app 'Consumer Key' and 'Consumer Secrets'. 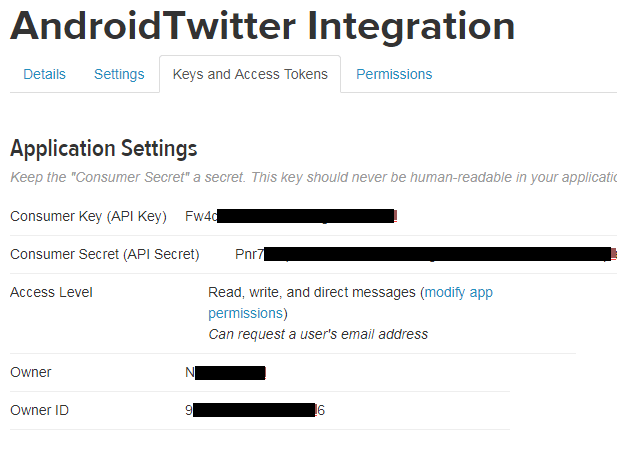
Example to Integrate Twitter Login in Android app
Let's create an example of integrating login through a Twitter account in an Android app. Create an Android app and add the following twitter dependencies in 'build.gradel' (Module) file. compile 'com.twitter.sdk.android:twitter:3.1.1' compile 'com.twitter.sdk.android:twitter-core:3.1.1' Make sure that "jcenter()" is present in 'build.gradel' (Project) file. strings.xmlPlace the 'Consumer Key' and 'Consumer Secret' of our app generated by Twitter in 'strings.xml' file.
<resources>
    <string name="app_name">Twitter Login Demo</string>
    <string name="com.twitter.sdk.android.CONSUMER_KEY">Fw4cXXXXXXXXXXX</string>
    <string name="com.twitter.sdk.android.CONSUMER_SECRET">Pnr7XXXXXXXXXXX</string>
</resources>
activity_main.xmlAdd the Twitter login button provided by Twitter API in 'activity_main.xml' file.
<?xml version="1.0" encoding="utf-8"?>
<RelativeLayout xmlns:android="http://schemas.android.com/apk/res/android"
    xmlns:app="http://schemas.android.com/apk/res-auto"
    xmlns:tools="http://schemas.android.com/tools"
    android:layout_width="match_parent"
    android:layout_height="match_parent"
    tools:context="example.com.twitterlogindemo.MainActivity">


    <com.twitter.sdk.android.core.identity.TwitterLoginButton
        android:id="@+id/login_button"
        android:layout_width="wrap_content"
        android:layout_height="wrap_content"
       android:layout_centerHorizontal="true"
        android:layout_centerVertical="true"
        android:layout_alignParentBottom="true"
        android:layout_marginBottom="40dp"/>

</RelativeLayout>
MainActivity.javaAdd the following code in 'MainActivity.java' file. We should place 'Twitter.initialize(this)' code before 'setContentView(R.layout.activity_main)'. If we place 'Twitter.initialize(this)' after the 'setContentView(R.layout.activity_main)' then our Twitter button will disable.
package example.com.twitterlogindemo;
import android.content.Intent;
import android.support.v7.app.AppCompatActivity;
import android.os.Bundle;
import android.widget.Toast;
import com.twitter.sdk.android.core.Callback;
import com.twitter.sdk.android.core.Result;
import com.twitter.sdk.android.core.Twitter;
import com.twitter.sdk.android.core.TwitterAuthToken;
import com.twitter.sdk.android.core.TwitterCore;
import com.twitter.sdk.android.core.TwitterException;
import com.twitter.sdk.android.core.TwitterSession;
import com.twitter.sdk.android.core.identity.TwitterLoginButton;
public class MainActivity extends AppCompatActivity {
TwitterLoginButton loginButton;
@Override
protected void onCreate(Bundle savedInstanceState) {
super.onCreate(savedInstanceState);
Twitter.initialize(this);
setContentView(R.layout.activity_main);
loginButton = (TwitterLoginButton) findViewById(R.id.login_button);
loginButton.setCallback(new CallbackNow we create another Activity for redirecting user after successful login. activity_home.xml
<?xml version="1.0" encoding="utf-8"?>
<RelativeLayout xmlns:android="http://schemas.android.com/apk/res/android"
    xmlns:app="http://schemas.android.com/apk/res-auto"
    xmlns:tools="http://schemas.android.com/tools"
    android:layout_width="match_parent"
    android:layout_height="match_parent"
    tools:context="example.com.twitterlogindemo.HomeActivity">

    <TextView
        android:id="@+id/textView"
        android:layout_width="wrap_content"
        android:layout_height="wrap_content"
        android:text="Welcome to HomePage"
        android:textSize="20dp"
        android:layout_centerHorizontal="true"
        android:layout_alignParentTop="true"
        android:layout_marginTop="40dp"

       />

    <TextView
        android:id="@+id/nametextView"
        android:layout_width="wrap_content"
        android:layout_height="wrap_content"
        android:layout_alignLeft="@+id/textView"
        android:layout_alignStart="@+id/textView"
        android:layout_below="@+id/textView"
        android:layout_marginTop="48dp"
        android:textSize="16dp"
        android:text="" />
</RelativeLayout>
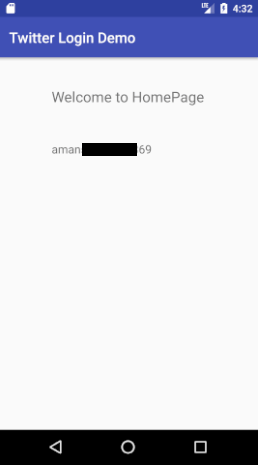
HomeActivity.javaIn this class, we will display the user name received from 'MainActivity.java' file in TextView.
package example.com.twitterlogindemo;

import android.support.v7.app.AppCompatActivity;
import android.os.Bundle;
import android.widget.TextView;

public class HomeActivity extends AppCompatActivity {
    TextView name;
    String user;
    @Override
    protected void onCreate(Bundle savedInstanceState) {
        super.onCreate(savedInstanceState);
        setContentView(R.layout.activity_home);

        user=getIntent().getStringExtra("username");
        name=(TextView)findViewById(R.id.nametextView);
        name.setText(user);

    }
}
Output: 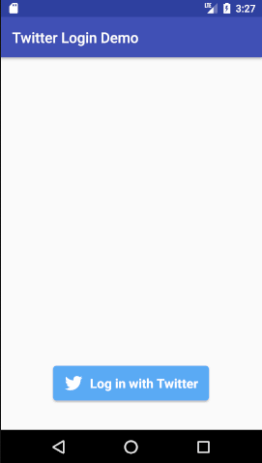 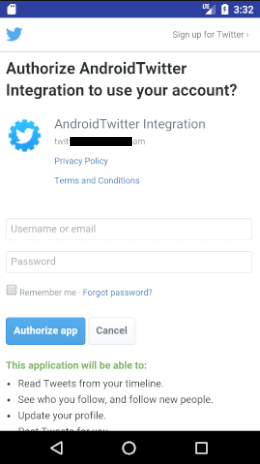
Next TopicAndroid Versions
|


Related Links:
- Android Emulator
- Android Auto
- Learn Android Tutorial | Android Studio Tutorial
- Android Hide Title Bar Example
- Android Versions
- Android Watch
- Android Custom ListView
- Android RatingBar Example
- Android WebView Example
- Android Preferences Example
- Android Internal Storage Example - TheDeveloperBlog.com
- Android Custom RadioButton
- Android AlertDialog Example
- Android TabLayout
- Android TabLayout with FrameLayout
- Android Volley Library - Registration, Log-in, and Log-out
- Android Spinner Example
- Android Device Manager
- Android Studio
- Android Interview Questions (2021)
- Android EditText with TextWatcher
- Android Activity Lifecycle
- Android File Transfer
- Android Linkify Example
- Android Custom CheckBox
- Android RadioButton
- Android Dynamic RadioButton
- Android External Storage Example - TheDeveloperBlog.com
- Android Screen Orientation Example
- Android SearchView
- Android SearchView on Toolbar
- Android Caller talker example
- Android StartActivityForResult Example
- Android Share App Data
- Android Fragments
- Android Option Menu Example
- Android Context Menu Example
- Android Popup Menu Example
- Android Intent Example
- Android Explicit Intent Example
- Android Bluetooth Tutorial
- Android bluetooth list paired devices example
- Android AutoCompleteTextView Example
- Android ListView Example
- Android AlarmManager
- Android Google Map Search Location using Geocodr
- Android Simple Graphics Example
- Android Animation Example
- Android Wifi Example
- Android Camera Tutorial
- Android Sensor Tutorial
- Android Image Switcher
- Android Image Slider
- Android Custom Toast Example
- Android ToggleButton Example
- Android Checkbox Example | Food Ordering Example
- Android Quiz | Android Online Test
- Android ScrollView Horizontal
- What is android
- Android TextToSpeech Tutorial
- Android TextToSpeech Example
- Android MediaRecorder example
- History of Android
- Android Architecture | Android Software Stack
- Android Core Building Blocks | Fundamental Components
- Android Widgets Tutorial
- Android Button Example
- Android Toast Example
- Adding Android Google Admob
- Adding Android Banner Ads
- Android Service Tutorial
- Android Telephony Manager Tutorial
- Android Call State Example
- Android Call State BroadCastReceiver Example
- Android Seekbar example
- Android DatePicker Example
- Android TimePicker Example
- Android Sqlite Tutorial
- Android SQLite Example with Spinner
- Android XML Parsing using SAX Parser
- Android RSS Feed Reader
- Android Analog Clock and Android Digital Clock Example
- Android ProgressBar Example
- Android ScrollView Vertical
- Android Firebase Authentication - Google Login
- Android Notification
- Android XML Parsing using DOM Parser
- Android XMLPullParser Tutorial
- Android JSON Parsing Tutorial
- Android ViewStub
- Android Network Connectivity Services
- Android Web Service | Android Restful Web Service
- Android Google Map
- Android Google Map displaying Current Location
- Android Messages
- Android Oreo
- Android TV
- Android Screenshot
- Adding Android Interstitial Ads
- Android QR Code / Bar Code Scanner
- Android Intro Slider Example
- Android RecyclerView List Example
- Android Swipe to Delete RecyclerView items with UNDU
- Integrating Google Sign-In in Android App
- Integrating LinkedIn API in Android App
- Integrating Twitter API in Android App