TheDeveloperBlog.com
C-Sharp | Java | Python | Swift | GO | WPF | Ruby | Scala | F# | JavaScript | SQL | PHP | Angular | HTML
Python Tkinter Entry
Python Tkinter Entry with python tutorial, tkinter, button, overview, entry, checkbutton, canvas, frame, environment set-up, first python program, basics, data types, operators, etc.
Python Tkinter EntryThe Entry widget is used to provde the single line text-box to the user to accept a value from the user. We can use the Entry widget to accept the text strings from the user. It can only be used for one line of text from the user. For multiple lines of text, we must use the text widget. The syntax to use the Entry widget is given below. Syntaxw = Entry (parent, options) A list of possible options is given below.
Example
# !/usr/bin/python3

from tkinter import *

top = Tk()

top.geometry("400x250")

name = Label(top, text = "Name").place(x = 30,y = 50)

email = Label(top, text = "Email").place(x = 30, y = 90)

password = Label(top, text = "Password").place(x = 30, y = 130)

sbmitbtn = Button(top, text = "Submit",activebackground = "pink", activeforeground = "blue").place(x = 30, y = 170)

e1 = Entry(top).place(x = 80, y = 50)


e2 = Entry(top).place(x = 80, y = 90)


e3 = Entry(top).place(x = 95, y = 130)

top.mainloop()
Output: 
Entry widget methods
Python provides various methods to configure the data written inside the widget. There are the following methods provided by the Entry widget.
Example: A simple calculator
import tkinter as tk
from functools import partial


def call_result(label_result, n1, n2):
    num1 = (n1.get())
    num2 = (n2.get())
    result = int(num1)+int(num2)
    label_result.config(text="Result = %d" % result)
    return

root = tk.Tk()
root.geometry('400x200+100+200')

root.title('Calculator')

number1 = tk.StringVar()
number2 = tk.StringVar()

labelNum1 = tk.Label(root, text="A").grid(row=1, column=0)

labelNum2 = tk.Label(root, text="B").grid(row=2, column=0)

labelResult = tk.Label(root)

labelResult.grid(row=7, column=2)

entryNum1 = tk.Entry(root, textvariable=number1).grid(row=1, column=2)

entryNum2 = tk.Entry(root, textvariable=number2).grid(row=2, column=2)

call_result = partial(call_result, labelResult, number1, number2)

buttonCal = tk.Button(root, text="Calculate", command=call_result).grid(row=3, column=0)

root.mainloop()
Output: 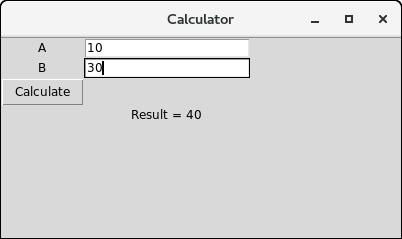
Next TopicPython Tkinter Frame
|


Related Links:
- Python global and nonlocal
- Python not: If Not True
- Python Convert Decimal Binary Octal and Hexadecimal
- Python Tkinter Scale
- Python Tkinter Scrollbar
- Python Tkinter Text
- Python History
- Python Number: random, float and divmod
- Python Tkinter Toplevel
- Python Tkinter Spinbox
- Python Tkinter PanedWindow
- Python Tkinter LabelFrame
- Python Tkinter MessageBox
- Python Website Blocker
- Python Console Programs: Input and Print
- Python Display Calendar
- Python Check Number Odd or Even
- Python readline Example: Read Next Line
- Python Anagram Find Method
- Python Any: Any Versus All, List Performance
- Python Filename With Date Example (date.today)
- Python Find String: index and count
- Python filter (Lambda Removes From List or Range)
- Python ASCII Value of Character
- Python Sum Example
- Python make simple Calculator
- Python Add Two Matrices
- Python Multiply Two Matrices
- Python SyntaxError (invalid syntax)
- Python Transpose Matrix
- Python Remove Punctuation from String
- Python Dictionary items() method with Examples
- Python Dictionary keys() method with Examples
- Python Textwrap Wrap Example
- Python Dictionary popitem() method with Examples
- Python Dictionary pop() method with Examples
- Python HTML: HTMLParser, Read Markup
- Python Tkinter Tutorial
- Python Array Examples
- Python ord, chr Built Ins
- Python Dictionary setdefault() method with Examples
- Python Dictionary update() method with Examples
- Python Dictionary values() method with Examples
- Python complex() function with Examples
- Python delattr() function with Examples
- Python dir() function with Examples
- Python divmod() function with Examples
- Python Loops
- Python for loop
- Python while loop
- Python enumerate() function with Examples
- Python break
- Python continue
- Python dict() function with Examples
- Python pass
- Python Strings
- Python Lists
- Python Tuples
- Python Sets
- Python Built-in Functions
- Python filter() function with Examples
- Python dict Keyword (Copy Dictionary)
- Python Dictionary Order Benchmark
- Python Dictionary String Key Performance
- Python 2D Array: Create 2D Array of Integers
- Python Divmod Examples, Modulo Operator
- bin() in Python | Python bin() Function with Examples
- Python Oops Concept
- Python Object Classes
- Python Constructors
- Python hash() function with Examples
- Python Pandas | Python Pandas Tutorial
- Python Class Examples: Init and Self
- Python help() function with Examples
- Python IndentationError (unexpected indent)
- Python Index and Count (Search List)
- Python min() function with Examples
- Python classmethod and staticmethod Use
- Python set() function with Examples
- Python hex() function with Examples
- Python id() function with Examples
- Python sorted() function with Examples
- Python next() function with Examples
- Python Compound Interest
- Python List insert() method with Examples
- Python Datetime Methods: Date, Timedelta
- Python setattr() function with Examples
- Python 2D List Examples
- Python Pandas Data operations
- Python Def Methods and Arguments (callable)
- Python slice() function with Examples
- Python Remove HTML Tags
- Python input() function with Examples
- Python enumerate (For Index, Element)
- Python Display the multiplication Table
- Python int() function with Examples
- Python Error: Try, Except and Raise
- Python isinstance() function with Examples
- Python oct() function with Examples
- Python startswith, endswith Examples
- Python List append() method with Examples
- Python NumPy Examples (array, random, arange)
- Python Replace Example
- Python List clear() method with Examples
- Python List copy() method with Examples
- Python Lower Dictionary: String Performance
- Python Lower and Upper: Capitalize String
- Python Dictionary Examples
- Python map Examples
- Python Len (String Length)
- Python Padding Examples: ljust, rjust
- Python Type: setattr and getattr Examples
- Python String List Examples
- Python String
- Python Remove Duplicates From List
- Python If Examples: Elif, Else
- Python Programs | Python Programming Examples
- Python List count() method with Examples
- Python List extend() method with Examples
- Python List index() method with Examples
- Python List pop() method with Examples
- Python Palindrome Method: Detect Words, Sentences
- Python Path: os.path Examples
- Python List remove() method with Examples
- Python List reverse() method with Examples
- Top 50+ Python Interview Questions (2021)
- Python List sort() method with Examples
- Python sort word in Alphabetic Order
- abs() in Python | Python abs() Function with Examples
- Python String | encode() method with Examples
- all() in Python | Python all() Function with Examples
- any() in Python | Python any() Function with Examples
- Python Built In Functions
- ascii() in Python | Python ascii() Function with Examples
- Python bytes, bytearray Examples (memoryview)
- bool() in Python | Python bool() Function with Examples
- bytearray() in Python | Python bytearray() Function with Examples
- Python Caesar Cipher
- bytes() in Python | Python bytes() Function with Examples
- Python Sum of Natural Numbers
- callable() in Python | Python callable() Function with Examples
- Python Set add() method with Examples
- Python Set discard() method with Examples
- Python Set pop() method with Examples
- Python math.floor, import math Examples
- Python Return Keyword (Return Multiple Values)
- Python while Loop Examples
- Python Math Examples
- Python Reverse String
- Python max, min Examples
- Python pass Statement
- Python Set remove() method with Examples
- Python Dictionary
- Python Functions
- Python String | capitalize() method with Examples
- Python String | casefold() method with Examples
- Python re.sub, subn Methods
- Python subprocess Examples: subprocess.run
- Python Tkinter Checkbutton
- Python Tkinter Entry
- Python String | center() method with Examples
- Python Substring Examples
- Python pow Example, Power Operator
- Python Lambda
- Python Files I/O
- Python Modules
- Python String | count() method with Examples
- Python String | endswith() method with Examples
- Python String | expandtabs() method with Examples
- Python Prime Number Method
- Python String | find() method with Examples
- Python String | format() method with Examples
- Python String | index() method with Examples
- Python String | isalnum() method with Examples
- Python String | isalpha() method with Examples
- Python String | isdecimal() method with Examples
- Python Pandas Sorting
- Python String | isdigit() method with Examples
- Python Convert Types
- Python String | isidentifier() method with Examples
- Python Pandas Add column to DataFrame columns
- Python String | islower() method with Examples
- Python Pandas Reading Files
- Python Right String Part
- Python IOError Fix, os.path.exists
- Python Punctuation and Whitespace (string.punctuation)
- Python isalnum: String Is Alphanumeric
- Python Pandas Series
- Python Pandas DataFrame
- Python Recursion Example
- Python ROT13 Method
- Python StringIO Examples and Benchmark
- Python Import Syntax Examples: Modules, NameError
- Python in Keyword
- Python iter Example: next
- Python Round Up and Down (Math Round)
- Python List Comprehension
- Python Collection Module
- Python Math Module
- Python OS Module
- Python Random Module
- Python Statistics Module
- Python String Equals: casefold
- Python Sys Module
- Top 10 Python IDEs | Python IDEs
- Python Arrays
- Python Magic Method
- Python Stack and Queue
- Python MySQL Environment Setup
- Python MySQL Database Connection
- Python MySQL Creating New Database
- Python MySQL Creating Tables
- Python Word Count Method (re.findall)
- Python String Literal: F, R Strings
- Python MySQL Update Operation
- Python MySQL Join Operation
- Python Armstrong Number
- Learn Python Tutorial
- Python Factorial Number using Recursion
- Python Features
- Python Comments
- Python if else
- Python Translate and Maketrans Examples
- Python Website Blocker | Building Python Script
- Python Itertools Module: Cycle and Repeat
- Python Operators
- Python Int Example
- Python join Example: Combine Strings From List
- Python Read CSV File
- Python Write CSV File
- Python Read Excel File
- Python Write Excel File
- Python json: Import JSON, load and dumps
- Python Lambda Expressions
- Python Print the Fibonacci sequence
- Python format Example (Format Literal)
- Python Namedtuple Example
- Python SciPy Tutorial
- Python Applications
- Python KeyError Fix: Use Dictionary get
- Python Resize List: Slice and Append
- Python String | translate() method with Examples
- Python Copy List (Slice Entire List)
- Python None: TypeError, NoneType Has No Length
- Python MySQL Performing Transactions
- Python String | isnumeric() method with Examples
- Python MongoDB Example
- Python String | isprintable() method with Examples
- Python Tkinter Canvas
- Python String | isspace() method with Examples
- Python Tkinter Frame
- Python Tkinter Label
- Python Tkinter Listbox
- Python String | istitle() method with Examples
- Python Website Blocker | Script Deployment on Linux
- Python Website Blocker | Script Deployment on Windows
- Python String | isupper() method with Examples
- Python String split() method with Examples
- Python Slice Examples: Start, Stop and Step
- Python String | join() method with Examples
- Python String | ljust() method with Examples
- Python Sort by File Size
- Python Arithmetic Operations
- Python String | lower() method with Examples
- Python Exception Handling | Python try except
- Python Date
- Python Regex | Regular Expression
- Python Sending Email using SMTP
- Python Command Line Arguments
- Python List Comprehension Examples
- Python Assert Keyword
- Python Set Examples
- Python Fibonacci Sequence
- Python Maze Pathfinding Example
- Python Memoize: Dictionary, functools.lru_cache
- Python Timeit, Repeat Examples
- Python Strip Examples
- Python asyncio Example: yield from asyncio.sleep
- Python String Between, Before and After Methods
- Python bool Use (Returns True or False)
- Python Counter Example
- Python frozenset: Immutable Sets
- Python Generator Examples: Yield, Expressions
- Python CSV: csv.reader and Sniffer
- Python globals, locals, vars and dir
- Python abs: Absolute Value
- Python gzip: Compression Examples
- Python Function Display Calendar
- Python Display Fibonacci Sequence Recursion
- Python String | lstrip() method with Examples
- Python del Operator (Remove at Index or Key)
- Python String | partition() method with Examples
- Python String | replace() method with Examples
- Python Zip Examples: Zip Objects
- Python String | rfind() method with Examples
- Python String | rindex() method with Examples
- Python String rjust() method with Examples
- Python String rpartition() method with Examples
- Python String rsplit() method with Examples
- Python Area Of Triangle
- Python Quadratic Equation
- Python swap two Variables
- Python Generate Random Number
- Python Convert Kilometers to Miles
- Python Convert Celsius to Fahrenheit
- Python Check Number Positive Negative or Zero
- Python Check Leap Year
- Python Check Prime Number
- Top 40 Python Pandas Interview Questions (2021)
- Python Check Armstrong Number
- Python SQLite Example
- Python Tkinter Button
- Python Find LCM
- Python Find HCF
- Python Tuple Examples
- Python String | rstrip() method with Examples
- Python String splitlines() method with Examples
- Python String | startswith() method with Examples
- Python String | swapcase() method with Examples
- Python Truncate String
- Python String | upper() method with Examples
- Python for: Loop Over String Characters
- Python String | zfill() method with Examples
- Python Sort Examples: Sorted List, Dictionary
- Python XML: Expat, StartElementHandler
- Python Urllib Usage: Urlopen, UrlParse
- Python File Handling (with open, write)
- Python Example
- Python variables
- Python Random Numbers: randint, random.choice
- Python assert, O Option
- Python Data Types
- Python keywords
- Python literals
- Python MySQL Insert Operation
- Python MySQL Read Operation
- Python ascii Example
- Python ASCII Table Generator: chr
- Python Range: For Loop, Create List From Range
- Python re.match Performance
- Python re.match, search Examples
- Python Tkinter Menubutton
- Python Tkinter Menu
- Python Tkinter Message
- Python Tkinter Radiobutton
- Python List Examples
- Python Split String Examples